Sunday, April 3, 2011

How to clean your window coverings.

The first step is to look at your window coverings and decide if they actually need a total cleaning.  Fabric coverings and blinds are treated differently.  For blinds please please please DO NOT take them down and try to wash them  unless the care instructions  indicate it’s OK to do this.  Often the cords are cotton and will shrink; the adhesives may be water soluble; the metal components may rust. Clean your blinds  by dusting with a wool duster or  vacuuming  followed by a light wiping with a damp cloth only;  no cleaning solutions. This means no cloths or ‘wands’ with built in cleaners. If you have a real dirt problem you need to find an ultrasonic blind cleaner person to come and clean your blinds.- See the link below for help with this.
For your fabric window coverings; remember that most drapery fabric is not washable but for those that are removable and not pleated you can put them in the dryer with a damp towel and ‘fluff’ them a bit. Consider what you will do if you have to iron them after fluffing. If you have pleated drapes vacuum them; both on the face and lining side. Tie them back  with the pleats in place and  gently steam with a hand held steamer. Let them sit still  for a few days. Check the content of the fabric before you steam. Natural fibers may shrink, silk may water stain.  
If you really need to wash your washable coverings, do it gently and use an extra large washing machine less than half full.  Try to re-hang them when they are still a tiny bit damp and smooth out any wrinkles with your hands. 
Not to long ago I was called to rehang a living room swag that had been taken down for cleaning.  The homeowner didn’t understand that all the pins  were there for a reason - to hold the swags in place. (I hasten to add I did not construct this swag initially...) When it came back from the cleaners it was one long piece and it took two of us several hours to get it to a semblance of what it was previously. Sometimes window treatments are not meant to be taken down at all;  if in doubt call me.
Family Drycleaning and I work together to get your drapes and valances cleaned. Call me, 833-1120; I'll come and remove the drapes, get them cleaned and re-hang them for you.

If you have venetians or blinds that need cleaning, Shuswap Window Cleaning offers a mobile service. They do it all for you at your home, 833-2533.  I have not used this company- they are new to me. If you have used their services and would like to comment, please e-mail me at linda@designsewltuions.ca

Friday, March 11, 2011

A few solutions

A Few Solutions
While not directly associated with home decor, the following problems  definitely fall under the category of ‘dilemmas’ and I’ve found solutions for them that make my life easier. I hope they will help you too.
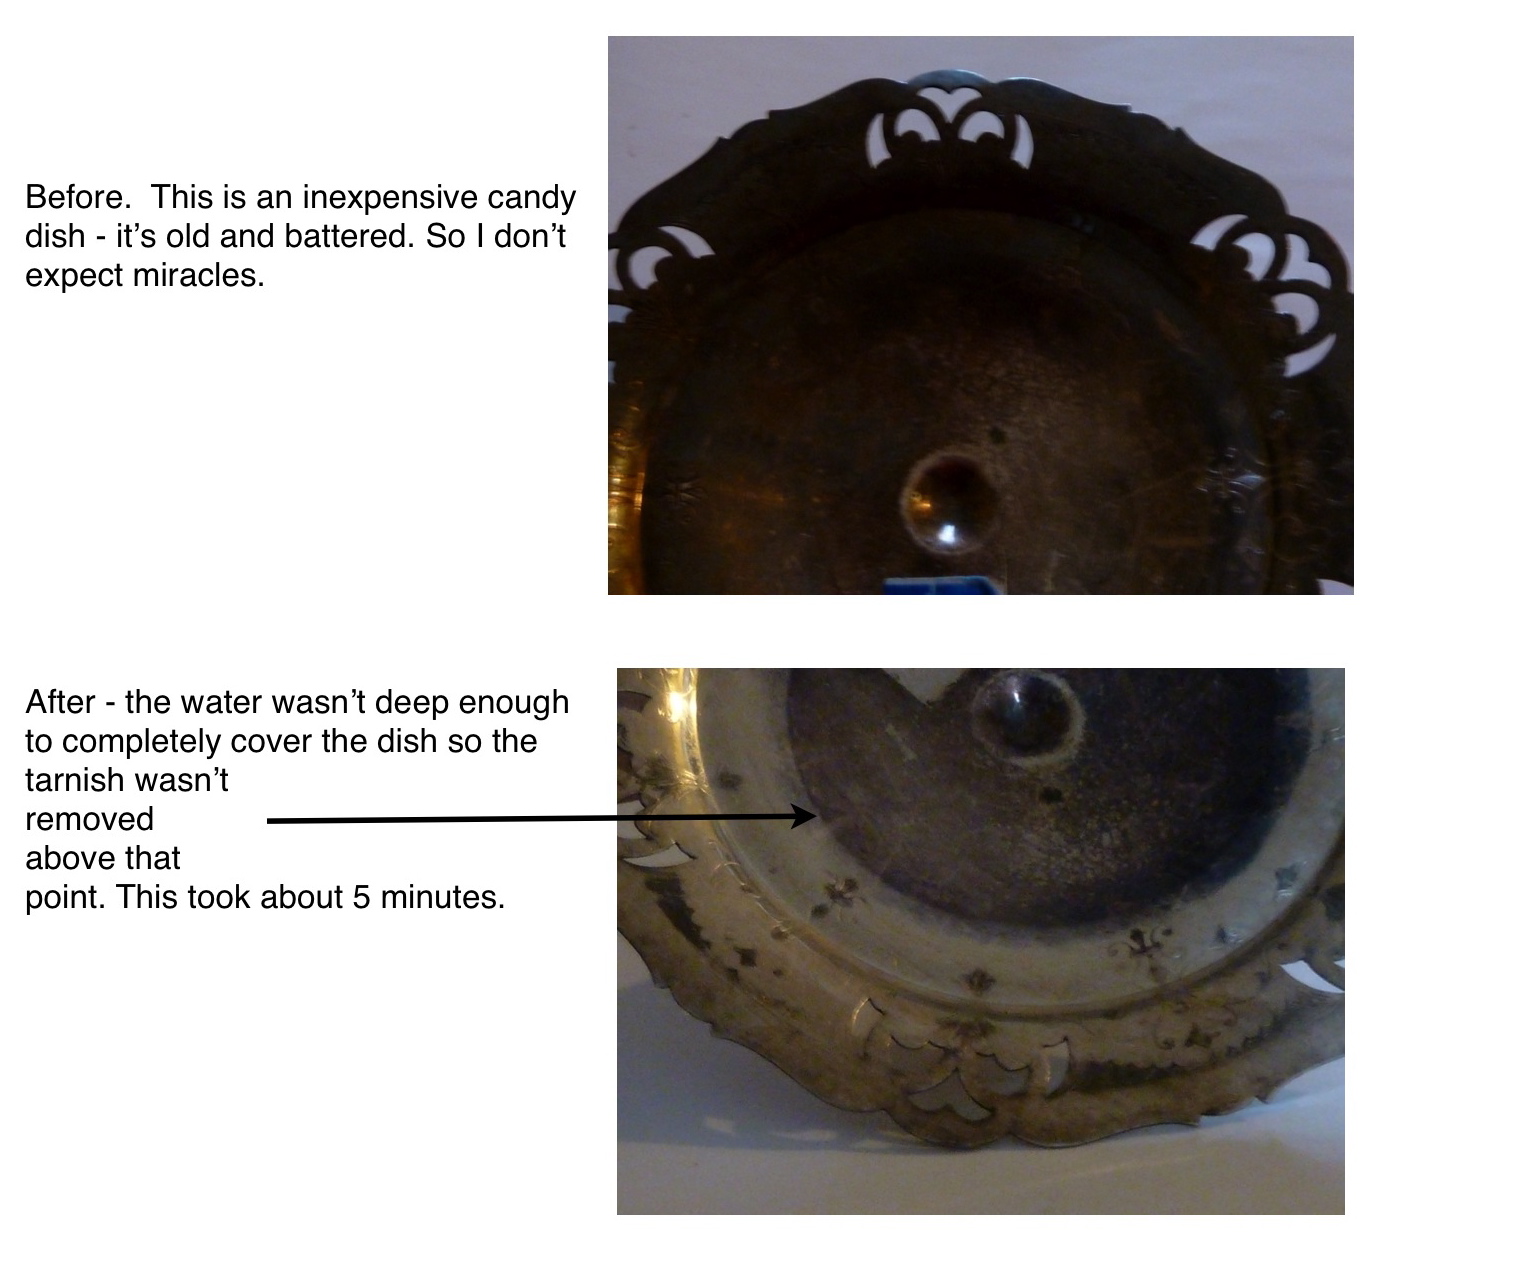
I used to do quite a bit of silversmithing; haven’t in awhile but recently I started to do some chain maille again. Which brings me to how to clean silver. I learned this in soldering class years ago; mix the original Dawn liquid detergent and baking soda into a paste the consistency of tooth paste and use a toothbrush to clean the nooks and crannies of tarnished silver. If you have large pieces; line your sink with tin foil  and sprinkle over it 1/2 cup of baking soda. Lay your silver on the tin foil and add boiling water to cover.  It smells a bit like rotten eggs but works very well.  To clean copper: clean it with the Dawn and baking soda first and then soak it in dark soy sauce. I’ll post some before and after pictures with this column on my website.
I hate the litter box. I bought a diaper pail and thought I’d scoop into a little sandwich bag and then drop those in the pail but the scoops didn’t fit the bags.  ‘Litter Locker’ does work, though.  Same idea, looks like a diaper pail but you deposit the scoops into the top, open the ‘trap door’ and the scoops collect in the bottom in a larger bag. Just like the diaper pail. And there is NO SMELL. So, instead of taking each day’s collection to the garbage, I only have to do it when the bag is full.  I got my Litter Locker at Zellers for under 20.00.
To remove pet hair from your clothes or furniture: put on a disposable latex glove and wipe the hair away. No kidding. I keep a box of these gloves in the kitchen for use with raw meat and hot peppers.  
And then there was the rust stain in the spare bathroom toilet. I tried at least 5 products - all saying they would do the job - and, of course, none of them did. I even broke down and tried elbow grease and Commet.  ‘ Super Iron Out’  Rust Stain Remover worked. Just like it said it would; I got it at Canadian Tire. 


Sunday, March 6, 2011

Clutter


I spend a fair bit of time helping people get started on the way to their vision of their home. 
Sometimes this is very difficult and usually due to clutter. I remember one house that had piles of clothes everywhere. The circular staircase led to a large second floor landing off which the bedrooms opened.  On the landing was a small path around the  3 foot high pile of clothes.  The piles continued into the daughters bedroom; the walls were covered with posters hung with scotch tape; the room was crammed with furniture and  every drawer was hanging open. It didn’t smell very pleasant either. The client wanted help picking a new paint color for the walls and seemed completely oblivious to the fact that the walls were almost totally hidden by the furniture and clutter. I was new to the business then so I just did what she wanted and helped her pick a color. I have thought about them often over the years, wondering what happened in that home. It was not a pleasant place to be; it felt heavy and oppressive. It felt disjointed and unhappy and I felt uneasy being there.
We know so much more, now, about the cause and effect of clutter in our homes.  It impacts our emotional well being and therefore  our personal and  professional lives. It increases stress levels; it encourages overspending; it causes us to use up precious time looking for things and now we know there is a direct relationship between the state of clutter in a home and the weight of the inhabitants. Yup.. clutter can make you fat. 
None of this is saying that homes must be minimalist.  If you need lots of stuff in your life, fine, but if it is not kept under control - if it becomes clutter - then the clutter will start  to change the way you think and act.  
One simple example:  If your kitchen is always in a ‘state’; preparing meals  can become a chore.  Quick meals eaten in front of the T.V. is a common result.  You will eat more if you do it watching T.V.
How do you know if you have a clutter problem? You probably already do know. 

Nine questions to answer.  Answer truthfully:
http://zenhabits.net/identify-clutter


Peter Walsh, one of the most reasonable of the clutter gurus:
http://www.oprah.com/home/Peter-Walshs-10-Tips-to-De-Clutter-Your-Home


And one more from the zen people - check out the links posted in this.
http://zenhabits.net/zen-mind-how-to-declutter/

Sunday, February 13, 2011

Follow up to color...

When I did my research for the column on the  color forecast, none of the sources I looked at mentioned blue. But in January  a major shelter magazine published their forecast with blue and green prominently displayed. I stand corrected.  To further add to the confusion Pantone later released their color of the year.  Pantone is the biggest of the big color poo-bahs.  If I wanted to tell my manufacturer in Indonesia exactly what shade of blue I wanted, we would both refer to our Pantone books.  Each Pantone color has an identifying number and there are over 2000 named Pantone colors in the current system.
So, their color of the year is ‘Honeysuckle’ 18-2120.  A friend thought that was blue, I thought it would be soft pink and someone else chimed in ‘No, it’s yellow’. Surprise surprise. Honeysuckle is HOT pink.  ’ A Color for All Seasons: Courageous. Confident. Vital. A brave new color, for a brave new world. Let the bold spirit of Honeysuckle infuse you, lift you and carry you through the year. It’s a color for every day – with nothing “everyday” about it.’ ( Pantone.com, ‘Pantone 2011 color of the year’). To me, it looks like fuscha .
I thought it would be interesting to find some paint this color, just for reference. In my Interior Decorating software I can import a color swatch,  get the ‘RGB’ numbers, enter those into a search and the system will tell me which of about 50 paint companies carry a color similar and the name of that match.  The closest I could find was Sico 4000 Color collection 4069-53 Secrets, or True Value 122 Pink Passion, but to be fair color matching on a monitor is not the best thing to do and the system doesn’t check every paint available. 
The ‘It’s  All About Women Conference’ held on January 29 was a great success. My two break out sessions were very well attended and we had a lot of fun painting and yakking. Thanks to  Tracie Affleck at Color Trends for donating two Para Paints fandecks as door prizes for these sessions.
If you want to see the Honeysuckle color, go to pantone.com. You can’t miss it, but here it is anyway. Quite a glorious color, isn't it?


Monday, January 31, 2011

Drapery Rods


definition: Curtains are window coverings usually hung on rod systems that open and close horizontally. Drapes are lined curtains.
Considering the  fact that most over the counter drapery  rods will only span a specific distance without bending; what’s a DIY’er to do?  You can spend a LOT of money on rods, or not very much at all but, once again, doing some homework will save you time, aggravation and money.
These are the questions you should ask yourself; they are the same questions I would ask you during a house call.
Do you want to be able to open and close your drapery easily and often? 
- Drapes hung on rings will catch on the expansion join of telescoping rods.
Do you need a cord operated system or can you hand draw the drapery? 
Do you want the drapery to clear the window when in the open position?
-If so, add about 20% to the window width and use this as the finished rod width.  Is there room on either side of the window for this? 
 How much distance will you need the rod to span without support?
-I rarely use a rod without a support at least every 3 or 4 feet. Therefore, most wood rod and rings systems available over the counter are not really suitable for full length drapery  that you want to draw  from the center to each side; or to one side only (as in a patio door).  
And the big one: how much room do you have to mount hardware? 
Now having answered these questions you have probably, if working on a large window, realized that you need a rod with brackets that do not prevent the glides from operating all the way along the bottom of the rod.  A  traverse rod  is cord driven and  will work, is not very expensive but is usually very ugly so you will need to think about a valance.  An I-Beam rod will work too, but is hand drawn and is not very pretty either. Or you can look at ordering a rod from someone like me who has access to new rods that do all the things we need them to do, look great and don’t cost a lot.   Call me if you would like to see some options.
Hope to see you at the ‘It’s All About Women’  Conference January 29 at the Prestige.

Saturday, January 15, 2011

Catching up a bit

Catching up.

A few catchup things this week. First of all, I’ll be at the ‘It’s All About Women’ Conference, Saturday January 29 at the Prestige, doing a little talk at 1:00 and repeating at 2:00. The subject will be color and light in your home. Come join us and learn some things and have some fun in the process. If you have a Design Dilemma bring  some pictures or information and I’ll do my best to help you solve the problem.  Itsallaboutwomen.ca.
I few months ago I told you about the Corded Shade problems in the U.S. and the recall of any corded blind. The new standards have been established and while the Canadian authorities have not, at this time, adopted them for Canada, indications are that this will soon happen.  In a  nutshell, any blind or drapery system that has exposed cords has been removed from the market.  New products have been developed for the fabrication of these  items and these products can also be used to retrofit existing  fabric blinds and shades. If you have a fabric blind constructed in the ‘old’ way with cords and rings I am now able  to bring these blinds up to the standards that makes it  almost impossible for children (and pets) to get caught in the cords and I will be using the new methods if requested on any future blinds I construct.  The products are quite innovative, don’t interfere with the look or function of the blind or shade and are not expensive.  Call me for more information. 250-833-1120
As a side note to this, if you have a blind with exposed cords in a room where children or pets have access, PLEASE take precautions to prevent a disaster like those that caused this dilemma in the first place.  Again, call me if you’d like more information on what you can do. 
Also, a few months ago, I told you about a beautiful older home that is being renovated. We finished the window treatments in the front sitting room and they are simply breathtaking.  I’ve posted pictures on my Gallery, get there via the website; Designsewlutions.ca and click on the flashing book icon to get to the Gallery.  Scroll down past the wing chair to the posting ‘ New Jewelry for a Grand Old Gal’. 
Hope to see you at the conference.
Oh... P.S. For those of you wondering, no I didn't get married, the name change is back to my 'maiden' name... 

-- 


Sunday, January 2, 2011

Color Forecast for 2011

Here is some good news for all of you who diligently followed the color mavins guides for 2010 and re-decorated according to their forecasts. 
You don’t really have to change much to be on the cutting edge for 2011. In terms of color. Which means that the ‘what will the colors be for 2010’  forecast was almost the same as the current ‘what will the colors be for 2011’ forecast.
All the trend colors are still grayed (or muted, in real colorist terms); vibrant jewel colors are not found; blue is almost totally absent and the only real green is what I (irreverently) refer to as hospital wall green. The neutrals are greenish though, as they were last year; in one forecast they all reminded me of shades of putty, except the pinkish one..
The red this year is an orange red, last year it was more of a blue red, purple is still there although this year it is appearing quite a bit darker. ( No mauve anywhere in sight). Brown is  represented by an olivey brown - we called it ‘breen’ back in the day; and the  yellow is not  a striking, clear lemon yellow like last year; it’s more of a golden yellow. 
I kept a few shelter magazines from late 2009 and compared them to the issues of 2010 for this column.   In general, at a glance, I’d say that the major difference in the forecasts is that 2011 look like ‘ spring/autumn’ colors while  those that were used for the 2010 forecast looked more like  ‘summer/winter’ colors. Those of you who have 
had your colors done will understand what I mean by this.
Pattern will be big this next year. Mixing styles will be big too - everything is being combined with everything and the fusion names are a lot of fun but I’m still trying to figure out exactly what ‘Indie Chic’ is... 
There you are - your guide to color for 2011. I just have one more piece of advice. I would like to tell you to scrunch this column up and toss it in the garbage - forget this forecast nonsense and do what is right for you and your home. But I can’t do that. So scrunch it up and toss it in the recycle bin instead.
I wish the very best for all of you this coming year.

Saturday, December 25, 2010

Winter window fixes

The cold snap reminded me that the windows in my new-to-me condo needed attention.   I finally took some time and made the insulated drapes for the balcony sliding doors and used a new lining that is flannel backed. Like the new black out linings it drapes much better than the older versions of the same thing and the price was actually less than regular drapery lining.  I took down the plastic verticals (they were there when I moved in) and installed a double rod, put some crinkle sheers up and then the soft yellow drapes and I love them. And the room is so much warmer.  If you want to do something like this yourself, look into the pre-made panels available that have blackout lining built in. 
I made  removable insulated liners for the bedrooms; I didn’t want to use black out lining - I like as much light as possible, especially in this dark season -  so I used a very thin cotton quilt batting that also drapes well and these rooms are  a lot warmer now too.
I don’t like to repeat myself but I thought this might be the time to remind you that you can make a difference in your heating bill by fixing your window treatments.
A home with 4” studs must have R-12 insulation. If you have a double insulating glass window with 1/2” air space between the layers, the R value of the window is about 2. Add a single layer of fabric, almost no increase, add a plain lining for an increase of about 1 for a total R value of R3. Add a black out lining; R-value is up to about R5 or 6. Add an interlining, and the R value jumps to about R9. Add an insulated Roman Blind and valance and the R value of the whole window treatment becomes about R16. Remember that the window treatments you are using to reduce heat loss must be snug to the window and layers will provide the best protection.  Think about this: if you have a blind inset into your window frame and the gap on each side is 1/8”, over 80 inches (40 inches on each side) this equates to a 3” x 3” hole in your coverage.
If you’d like to know how much of your heating costs are going out the window, e-mail me; info@designsewlutions.ca.

Space Heaters

So there I am, shivering from being outside in the COLD, standing in front of the space heaters in the hardware store. I needed to buy one and I didn’t have a clue which one to get. The clerk couldn’t help, so I picked one on sale and took it home. Then I did some research and found that I had bought the wrong one. 
I should have taken a page from my design training and really looked at what I needed before I bought one. So, to help you not make the same mistake, here is your space heater primer. ( These all refer to plug in electric heaters ).
To heat a whole room with a constant heat the best is an oil-filled radiator type. They take a bit longer to warm up but are very efficient. No fans though. 
To heat a  space with  fan-driven heat: Ceramic heaters. 
To heat a small space quickly, like your toes under the desk; choose a radiant heater. The feeling is like sitting in the sun.  The most efficient of these are the halogen heaters; they work with the same principal as halogen light bulbs and come to temperature almost immediately.
Do you need a thermostat? auto shutoff? timer control? oscillating fan?  Think about the answers before you go shopping. 
NEVER use a space heater with anything other than the recommended extension cord.  A regular household cord is not good enough, don’t risk it.     
It would seem that a 1500 watt heater would be ‘better’ than an 800 watt heater. This is not necessarily so.   An 800 watt radiant heater will do the job it was intended to do quite nicely.
How much does it cost to run one?
Divide the watts by 1000 and multiply by the cost of electricity per hour and you have your hourly cost. Here we pay  6 to 9 cents per kilowatt hour. Lets use 10 cents.
A 1500 watt heater: 1500 divided by 1000 = 1.5. Multiply this by 10 cents = 15 cents per hour.  But, if an 800 watt heater is all you need,  the cost drops to 8 cents per hour. A light bulb costs .6 of a cent per hour, a computer and monitor 4 cents, a fridge 10 cents. 
I returned the heater; got the correct one and now I’m much warmer and I saved money too. 

Wednesday, November 24, 2010

An Older Home

I’ve been asked to do a window treatment in an older home. The homeowners are very lovingly restoring this beauty and are taking care to do it with period appropriate designs.  We have a photo to work from; it’s a perfect design for the room and the home. But, it’s a very complicated design - one that isn’t done often and  so I have had to do some homework.  I’m very fortunate to have  access to a network of people like me throughout North America  and I asked for advice. I was directed to a gal in Georgia who had done exactly what we are planning here  and was pleasantly surprised to receive a phone call from her.  She shared invaluable information and suggested I look at another site that was specific to ‘Old World Window Fashions’. ( From that site I was directed to a  gal who actually teaches old world patterning and  I’m going to attend her spring course). 
As I was looking at the older window fashions  I was struck by how similar, in many ways, they were to what we do now with our window treatments. Good fabrics, well considered design; good construction. In his definitive book on the subject, published in 1887; one of the most prominent window drapers in the US; Frank Moreland; states: “In most cases the choice of colors is controlled by the previous treatment of the rooms; for usually the hangings are the last things considered, and the draper the last person called in.” Did you catch that? The window coverings should be the last thing done in a room. Not the first. 
I know I’ve lost sales because I advised potential clients to wait to make the decision on window coverings.  I know the temptation is there to pick fabric and run with it; matching the room furnishings later. Believe me, though, it’s a lot easier to pick fabric to coordinate with the walls and furniture than it is to pick a sofa to match the drapes.  Your windows will have specific requirements, heat and light control, privacy, functionality - and don’t forget budget. You won’t know all of the requirements until you have lived in the room for awhile.
So - back to the older home. We are taking our time; we have fabric to work with that is presenting challenges; the design is a challenge too; but the homeowners have waited and now know what the room needs and what they’d like to see.  I’ll keep you posted

More floor plan

If you want to continue on with your floor plan you have a few choices to make now. You can draw it to scale   and add outlines of furniture; you can go on line and do a computer generated floor plan or you can call a designer and get a floor plan done for you. 
Here is why you should do one of these things:
Your floor plan is the map for the room. It tells you where the furniture will be placed, it shows the size of the furniture.  With the addition of lighting it shows what type of fixtures you will need and where they will be placed. If you are working on a living room, it will now show the shape and size of the coffee table and it will show the size of any area rugs you need. You will have sizes for any occasional furniture or floor accessories. 
The size and type of each piece of furniture, lighting or accessory should be listed on a sidebar of the plan.  This is your room shopping list.  Now, when you are selecting elements for the room, you will know exactly what you need and in what size.  Just like we know that that we should not go grocery shopping when hungry, we should not do room arranging without a plan.  If you have existing pieces that are to be used in the room you will know where they will be positioned and what their intended use is. You won’t buy extras or pieces that won’t fit.
The next step in the process is to decide what style of room you are doing. You could, for example, want to do a Victorian room, or an Art Deco room, or a Retro room. Or you could be doing a Contemporary room  which often incorporates antiques and new pieces; this is the most common style for this area. Look at some magazines, go online, get a feel for what you want. We’ll continue with this in the next floor plan column.
 I can do a floor plan for you - it could be just a floor plan or could be the start of a whole room design; elevation, floor plan and mood board.  See one at Designsewlutions.ca; connect to the Gallery via the flashing book and go to the ‘Visualize This’ feature. 

Friday, October 22, 2010

Old Dogs and New Tricks

I was doing some research the other day and came across a statistic that I thought I’d share: Ideas that are being explained with the use of verbal and visual tools are 6 times more likely to be understood than ideas being explained with verbal tools only.  I have know for a long time that the phrase ‘I just can’t visualize it’  coming from a potential client was one of my biggest hurdles to overcome. I can see the finished product very clearly in my head but I am not an artist.  So a few years ago I took drawing classes. I had to label the drawing I did of a shoe to explain what it was.   I spent hours learning how to draw simple examples of window treatments so I could better explain my vision but  they never were to my total satisfaction. 
As my business grew and my knowledge increased, it became more and more important for me to find a way for my clients and I to communicate on this non-verbal level.   About 3 years ago I found  software that fit the bill  and have  since been working with the program on and off.  A few months ago I took the proverbial bull by the horns, signed up for the advanced course and have spent the last 6 weeks with my nose stuck in my computer. The result is that my hair is a mess, the dust bunnies have grown up to full rabbit size and  the cat doesn’t know who I am anymore but I can now produce some really good renderings for my clients. I can, for example, take a picture of your living room, design some drapery on the actual windows and  fill them with the actual fabric you have chosen so you can actually SEE what things will look like after everything is done. Similarly, I can take a blueprint, or a floor plan and design the furniture layout in scale for you.   I can paint the walls a new color, add a new rug or  show you what the sofa will look like with a slipcover. 
I have my clients to thank for this. They are the ones who pushed me to get better, to find new ways to meet their needs.  It was one of the most difficult courses I’ve ever taken but I learned a really valuable lesson: You CAN teach old dogs new tricks.
Click on 'The Gallery' to the right of this post to see some of these renderings..

Floor Plan continued

Continuing with the floor plan.
If you’ve been doing the homework, you should now have a floor plan with the appropriate ‘seats’ in place.  This very simple exercise shows you where people will sit in the room and what type of furniture you need in that room.  Now you need to look balance and traffic flow.
In design school, we worked on floor-plans that we divided into 4 quadrants and  we really looked at how they related to each other.   Doorways have ‘weight’, they occupy space  equal to  the door swing and if the door opens out, at least 36 inches inside the room is considered door space.  Get your floor plan with the seats placed on it and draw a line through the center horizontally and vertically. This creates your 4 quadrants. Look at the placement of the seats. Are they all smushed into one half of the room making   one quadrant much busier than any of the others? If this is so, the room is not in balance and you need to give some thought to additions to the room that will help fix this. If you have, for example, a fireplace and seating in one quadrant, what is on the opposite wall to balance this weight?  Use a bench and a large picture, an armoire, some bookcases - something to counter the fireplace. The large picture window on one wall needs to be balanced on the other - again use furniture, or large accessories to accomplish this.  This takes some work and imagination, but it will be worth it.
You must also look at the traffic flow. How will people move through the room? It is not a good idea to have the main traffic flow pass between the sofa and TV, for example. Nor is it a good idea to force people to walk around furniture or plants to get from one side of the room to the other.  We are creatures of habit and we will find the path of least resistance, even if it means moving something out of our way.   I use the example of Frasier Crane’s living room on the TV show. Traffic was directed from the main door to the rest of the apartment  by the placement of the sofa and table in front of, but backing onto, the fireplace, leaving a clear pathway-  a natural direction for traffic instead of in front of the sofa;  between it and Marty’s TV.

Sunday, September 26, 2010

The floor plan continued.


Now that you have your floor plan drawn to scale you have done all of the tedious work. Just a bit more homework and then you get to play.


Write down what the room is used for and how many people participate in those activities. This should include the possibility, for example, of having seating for 10 in the family room when the kids bring home their ‘significant others’ for Sunday dinner. ( Does anyone still do that? I hope so). Do you need one corner for reading? One corner for the computer? Write it all down. This is called the room usage list and it drives the amount of seating, and therefore the type of seating, the room will require. For example; if your dining room table normally seats 4, but you need it to seat 8 on occasion, you will need a table that expands; the space to expand it into and chairs to accommodate the extra guests.


Once you have this usage list completed, cut out some small squares that will represent 30” square. This is the ‘seat space’. If you need seating for 10, cut out 10 squares. Put your floor plan inside a plastic binder sleeve, ( you can write on this with a highlighter and it erases easily) If there are some ‘givens’ in the furniture - such as the piano- sketch these in first. Now place your ‘seats’: 3 for a sofa, 1 for a chair. In the family room, extra seating may be the extra dining room chairs, or a large ottoman, or a bench under the window but again, you need to fore-plan so the room remains functional at it’s optimum seating capacity. Orient your main group of seats toward the focal point - a 3 seater sofa, for example, toward the fireplace or window.


Play around with this, next column we’ll continue on.


An update on the Corded Blind recall and new guidelines... The American National Standards Institute and the Window Covering Manufacturers Association have published the new guidelines for the manufacture of blinds with cords. The American Window Coverings Association is ‘translating’ the document and those of us who manufacture these blinds should have clear guidelines in the near future.


Saturday, September 18, 2010

A few loose ends


This column will be a bit of a catch-all, so please bear with.


I hope that any of you who are actually taking the time to do a floor plan will take this week and finish it. In the next column I’ll help you continue with the process of designing a room by looking at the usage of the room and what that means to you and your floor plan.


Sundial lighting in Vernon now has stock of the spray chandelier cleaner.


Once again this week I had to witness the very sad outcome of what happens when you don’t test your paint color first. The interior of this home hadn’t been painted in a long while, the walls were a soft beige. The homeowner chose a color based only on a small paint chip and bought enough paint for the entire job. Unfortunately the natural light in the room has a very strong effect and instead of a soft pastel it has become a rather overwhelming acidic color. There is talk of re-upholstering because some of the furniture no longer works. The house is also open concept. The color they chose is also a trendy color. I would wager they will be re-painting within a year. You can check my website http://designsewlutions.ca/archives for my column ‘How to choose a paint color’ from June 5, 2009 if you are thinking of painting. Please do this.


Winter is coming. So, now is the time to look at your home and make sure you don’t have any heat ‘sinks’. This is what I call those places in the house that suck the heat out of a room. The crack under the door, the window that doesn’t shut all the way or the fireplace that takes all the warm air up and out. Get your drapes cleaned now if they haven’t been done in a few years. I will come and take them down, get them cleaned and rehang them for you. This is also a great time to have your venetian blinds cleaned of all the summer dust. Be careful cleaning them. Often the cords or tapes are cotton and too much water will cause shrinkage. Clean each vane. Tedious but necessary. When done, close the blind and lightly spray with static guard, close the blind the opposite way and spray again. The static guard helps keep dust from ‘sticking’.


And.. Happy Anniversary to me!!! I’ve been writing this column for two years now. Thank you for reading.

Friday, September 3, 2010

Floor Plan Part 2

How to make a floor plan.


First of all, you do not have to be a drafting genius to do this. But you do need to do it.

Get some 1/4 inch graph paper. Each square on the paper will represent 6 inches of floor. If you are a metric type, get metric paper use 10 cm per square.. or whatever.


Draw a rough outline of the floor, note the doors and windows.

Go back and measure the room, measure the floor inside the casings. For example, wall to wall may be 60 inches wide but the casings takes up 1 inch, therefore on the plan, the floor is drawn as 59 inches. Why??. Because if you draw 60 inches, and buy an armoire 60 inches, and the floor space is actually only 59 inches you have a problem.


Mark the door openings as to the size of the opening, not outside casing to outside casing. Mark the window inside widths on the floor plan as well. Indicate all the measurements on the rough floor plan. Include things like the distance from the window to the wall... When you have all the rough measurements,transfer the information to a new plan with nice, straight lines. You do not have to mark the measurements on the graph paper - it would become really crowded if you did and remember that each square is equal to 6 inches on the floor so you don’t really need the measurements on the plan.


And, even though they are not actually on the floor, indicate the wall electrical outlets, cable or satellite positions and any telephone lines. Also add the heat vents, radiator if applicable and the fireplace and hearth. Put the doors in, indicating which way they swing.


If you don’t want to do this yourself, hire a designer or decorator to do it for you. I, for example, will do a floor plan, a furniture plan, and elevations of the main areas. ( ‘Elevations’ are rather like snapshots of one part of the room, showing the floor and the wall and the furniture as it would appear if you were standing in the middle of the room.) See one on my website Designsewlutions.ca.


Once your floor plan is done indicate the traffic flow, add furniture and lighting. Then it’s time to get to the fun part, picking fabric and surface finishes. That is done on a story board. More about that in the next column.


Friday, August 20, 2010

A Floor Plan


Number one on the list of things to do if you are considering a room make-over, a renovation or especially if you are building is a floor plan of each room.


Here are a few of the ways a floor plan will help you:

It will tell you the size of the furniture you should have in the room. Have you ever heard about the new sofa being delivered and not fitting into the room? A floor plan would have foreseen this.

Working with a room usage list, it will tell you where to place lighting in the room.

It will tell you the size and shape of the coffee table, area rug and dining table.

It will show you how people will move through the room, and will prevent traffic flow problems.

It will help you plan seating for the maximum number of people you foresee having in the room.

It will tell you how big the armoire to house the T.V. should be and what size that T.V. should be. Yes it will.

It will tell you how big the bed can be and what size the bedside tables should be.

It will tell you how to make the living room conducive to conversations.

It will show you if the room is ‘balanced’ or not. - We have all been in rooms where the majority of the furniture is on one side of the room, giving the room a feeling of more weight on one side than the other. It feels off center.

It will save you money because you won’t be buying anything not on the plan.


It takes a bit of time to put one together, but, like a business plan, once you have done it you will wonder how you managed without it. When you go shopping for a piece of furniture, you will know how big it should be, think of the time you will save if you can say to the furniture salesman ’ My sofa should be 80 inches long, don’t show me anything other than that, please’. It will save you money; no more impulse buying. We have all bought something, thinking ‘Oh -I’ll make it work’ only to find it is too small, too tall, too wide, and the piece ends up in the basement.


In the next column, I’ll explain how to do a floor plan to scale.

Sunday, August 1, 2010

Walk along main street.


One of my favorite things to do in Vancouver is walk along Main street, from 49th to 52nd or so, cross the street and walk back up to 49th. It usually takes me 3 or 4 hours to complete the trip. This is ‘Little India’ and it is the place I like to go to get my color fix. The sari shops are always busy, it’s fun to stand back and watch the ladies shop. I always go into the bridal shops too, the beaded saris and men’s jackets never fail to take my breath away. There is one little shop that sells only bangles and the jewelry stores defy description. My favorite stop is the Punjab Cloth House. I went in once and told the gentleman behind the counter that I needed some silk chiffon ‘This color’, and pulled out my swatch. He gestured at the floor to ceiling, 30 feet wide expanse of shelving behind him, full of flat bolts of silks and said ‘ You come and look’. I did, and found exactly what I was looking for. Silk chiffon, 8.00 per meter. I often buy the dupioni silk for cushions - it’s about 10.00 per meter. They also carry a very fine, thin silk that is perfect for lining in garments and makes the BEST underslips for summer dresses; about 7.00 a meter.


I’m sure there has been someone, somewhere, who has written a paper relating the physical climate of a society to the use of color in that society. I’ve never been to India, but I understand the natural landscape is vibrant. Think flowers and birds... Now, think of Scandinavia; I think of snow and ice in winter, blue water and green trees in summer, but not a lot of tropical flowers and the decorating style somewhat reflects this.

French Country: summer sun yellow and vibrant blue sea. Tuscan: Terra cotta, olive green, vibrant blue. I think this correlation may explain why some styles work better in our climate than others. I am in a lot of homes in this area, and I have to say that the homes filled with heavy antiques sometimes feel a bit out of place here unless they are well balanced with some whimsy and lightness. Just some things to think about.


I was so very fortunate to be asked by my friend Diane Jewel to attend the Skwlax Pow Wow on July 17. If you haven’t been to one of these events, mark it on the calendar for next year and then make sure you go. I listened, I learned, I was amazed and I was humbled.

While you are in the area, check out Rokkos Fabrics at 6201 Fraser. ( Remember the trick about Vancouver streets? 6201 is at 46th and Fraser - subtract 15 from the first 2 digits of the street address to find the cross avenue.)


Well, the Punjab Cloth house has moved, I guess, to Surrey 12725 80 Ave but there are a lot more cloth shops on Main, don't miss this street.


Friday, July 16, 2010

Chandeliers


Every go into a room and see a fixture hanging over the table and wonder why it is hung so high? Or why it looks so small, or so large? Well, there are a few guidelines ( once again, design principles are guidelines, not rules) to help you avoid these oopses.


The size of a chandelier hanging over a table is determined by three things: the size of the room, the size of the table under it and the height of the walls in the room. In a nutshell, if you add the width in feet and length in feet of a room this will tell you the inches of diameter that a chandelier should be. For example, a 10 foot by 12 foot room will accommodate a 22 inch ( diameter ) chandelier. Now comes the exceptions part: take into consideration the width of the table. Chandeliers are very often 1/2 the width of the table. A 48 inch table is balanced by a 24 inch chandelier. But these 2 guidelines work well together, a 10 x 12 room probably doesn’t have room for a table larger than 48 inches wide.


The height of a chandelier is usually calculated as being 2-3 inches for each foot of the wall height. A 10 foot wall, therefore calls for a 20 to 30 inch long chandelier.


The height above the table is generally suggested to be about 30 inches.


So, in the 10 x 12 room with 10 foot ceilings and a table 48 inches wide the chandelier would be 22 to 24 inches in diameter and 20 to 30 inches in length.


If you are hanging a fixture in a hallway, use the wall dimensions to calculate the size of the fixture, and remember that over a stairway the perceived wall height is 2 stories, so the fixture should be longer.


Now to cleaning the thing. Get some chandelier spray. You put newspapers on the table and spray the chandelier with the cleaner and the dust drips off. No rinsing, no taking the fixture apart. It works. (Go to DesignSewlutions.ca/archives for suppliers.)


Before Katrina I was in New Orleans and happened onto a shop in the French Quarter that had a chandelier for sale that was 6 feet in diameter and 7 feet long. Baccarat Crystal. It had about 300 light sources on it, was from France late 1700’s. Price: $289,000.00. I would have loved to see the room it ended up in.


My favorite chandelier spray is called Sparkle Plenty. The manufacturer says it is available at Home Hardware but none of the three I checked had stock, or planned to stock it. Their stock number is 4521-663. If you call, they say they will order it though.

SunDial lighting in Vernon carries a spray but they are also out at the moment, waiting for supply. Brilliante is a great product, it is useable as a cleaner for glass surfaces as well and they offer free shipping to Canada ( from California) brilliantecrystalcleaner.com. I'll keep looking for a shop that actually has one in stock and let you know.

Monday, July 5, 2010

Shade Fabrics

Shade fabrics.

Summer sun is back. Finally. I’m getting lots of calls about sun blocking drapes and how to prevent sun damage to furniture and floors. The sewlution is very simple, and you have quite a few choices. Any of these will prevent your floors and sofas from getting sun-bleached and will block the heat too. This is a quick summary of what is available; call me or go to my website for more information.

One of the best (and least expensive) is solar film. It’s professionally applied to the outside of the window and will block about 65-85% of the UV rays (those are the damaging ones). From the outside, your windows will look slightly reflective, from inside the window appears slightly tinted. One of my clients had this installed and she told me that it was the first time in many years she was able to leave her front room drapes open in the summer and actually see her beautiful yard. Trademark Glass in Salmon Arm sells and installs this product. I am sure they have references you can call. if not, I have.

All the blind companies sell various levels of sun block shades that work very well, and the big box stores also sell shades that they will custom cut for your windows.

You might want to have shade on the deck, or around your balcony. Shade cloth is available as a knit or a woven, either of which can be fabricated into drapes or panels for use outside. The woven is used in pre-constructed blinds such as roller shades or can be purchased by the meter from on-line sources or at the local fabric store. It provides a UV blockage of up to 95% while still being somewhat transparent. The downside is it looks ‘plasticy’ and is very stiff. Knit shade cloth comes in a wide range of colors with UV protection from 35-90% and can be sewn on a home machine. Knit shade cloth can be purchased on line at http://www.shadeclothstore.com/depts/knittedshadecloth.html. They will ship to Canada via UPS. They also sell the woven cloth, as does Fabricland in Salmon Arm.

Blackout lining for your drapes is a great solution. The new blackout is very soft and drapes beautifully. If you are having new drapes made, or just want removable liners for existing drapes made, this lining provides total sun block and wonderful insulation and using this fabric as a lining will increase the R-Value of your drapes by 3-5 points.

So, there you go. You can have sun-blocking, have it look good and fit your budget.

Friday, June 18, 2010

Math

I was miserable at math in school. My Grade 10 teacher agreed to pass me if I promised never to take math again. (True story). I use a lot of math in my business now, fractions, decimals, converting meters to yards, inches to centimeters. I’m pretty good at it and do most of it in my head. Who would have thought. I also flunked potholder in Home Ec. Here are a few things you may not know but might be a good idea to tuck away for future reference. Because so much of what we use in the decorating world is from the U.S. a working knowledge of both inches and meters is essential.


A meter is a little more than a yard. ( A meter is actually 39.5” but we’ll use 40” for ease of calculation, a yard 36”) Every 4 inches is .1 of a meter or 10 centimeters. So, if the pattern says 1 yard is required, this is 36” divided by 4 equals 9; you would need .9 of a meter. If you need 7 yards, this is 7 times .9 = 6.3 meters. 2.5 centimeters is one inch.


How much paint is needed? The wall is 10 feet wide and 8 feet high. 10 times 8 = 80 square feet on the wall. If there is a huge window, 8’ x 6’, for example you can subtract 48 ( 8 x 6 ) from the 80 and the actual square footage you need to paint is 32. This is also the basic formula used to calculate wallpaper requirements and flooring. There are 144 square inches in a square foot.


The width of a window is the measurement from side to side. The length is the measure from top to bottom. Measurements are always written as width first, then length.


How do I know how much that foam cushion will cost? If you are buying foam from most retailers the price will be listed per foot of ‘thickness’ but is actually calculated in board feet. If you can do this yourself you will get a much better idea of exactly what you are paying. A board foot is a piece of something 12 inches wide, 12 inches long and 1 inch thick. A piece of foam 12 x 12 x 2 is 2 board feet. You want a cushion 24 x 36 by 5 inches thick. 24 x 36 = 864. This is the square inches on the ‘surface’. Divide this by 144 ( the number of square inches in a square foot ) and we get 6. This is the square feet on the surface. You want the cushion to be 5 inches thick. So.. multiply 6 by 5 and you get 30 board feet in your cushion. Don’t fall over when you see how much foam costs per board foot.


Fun stuff; nothing to do with home decor: To convert Celsius to Fahrenheit , add 15 and double it. 20 degrees Celsius plus 15 is 35, times 2 is 70 degrees Fahrenheit. Just reverse to take Fahrenheit to Celsius. To convert kilometers per hour to miles per hour, multiply the first digit by 6. 60 kph is 36 mph. 65 kph is the 36 plus 6 times 5 = 3 for a total of 39 mph.


And lastly, one of my favorite nonsense bits for all of you who travel to Vancouver. To find out what the avenue is crossing a main street at a specific address, subtract 15 from the first 2 digits of the address. 4500 Granville is at Granville and 30th.

Down in Duvets


I remember my Dad telling me that 2 inches of newspaper is as warm as 2 inches of feathers. I’m not sure if that is actually true or not, my Dad had a lot of this kind of knowledge stored in his brain, but I’ve learned some things about down ( as in duvets) that follow along with this theory.


The warmth of a duvet is dependent on the amount of warm air trapped in the fibers of filling. The quality of down is measured by fill power and good down duvets will have this figure listed on the label or packaging. Fill power refers to the number of cubic inches that one ounce of compressed down will ‘fill’ when uncompressed. If the number is 500-550, it is considered good with higher numbers 550-700 being the best. So, a high fill power rated down will give a higher loft and trap more air, thus being warmer than a lower fill power down. This is also the fluffiness factor. The same thickness can be achieved by adding more down of lesser fill factor, but this increases the weight of the duvet. Duvets are also rated by weight, a king size bed duvet would be 50 ounces for the warmest, 35-40 ounces for the medium and 30 for the light.


Down is not feathers. Down is what grows on the bird at the base of the feathers. Feathers are not interchangeable with down and a feather pillow, or comforter is decidedly different than a down one. Most down found in ready made duvets is harvested from young birds that have been raised for consumption. Eiderdown is considered the ‘gold standard’ and is harvested by hand from the abandoned nests of the Eider duck, in Europe, and the cost of an Eider down duvet can approach $12,000.00.


Down is warmer than synthetic insulation ounce for ounce, it retains its shape and loft and will wick body moisture away but down looses it’s warmth when wet and is difficult to dry. It is highly compressible and lightweight but requires special cleaning and may contain allergens. It certainly wins in the fluffiness category but needs to be shaken and fluffed daily to keep this look.


I understand that in some European countries employees are allowed a certain number of days off work per year (just ‘cause) and they are often referred to as ‘Duvet Days’; days to just stay home and snuggle under the down duvet. What a good idea.